

When emergencies strike, knowing what to do in the critical first few minutes can mean the difference between life and death. Whether it’s a car crash, a fall, a choking incident, or a sudden cardiac arrest, having basic first aid knowledge empowers you to act quickly and effectively. And it all begins with understanding seven essential steps.
In this comprehensive guide, we’ll break each step down clearly and practically, so you can remember them easily and apply them confidently, potentially saving lives in the process.
Step 1: Assess the Situation
Before you take action, the first and most important thing is to assess the scene.
Ensure the Scene is Safe
Rushing to help without checking your surroundings can lead to more harm than good. Take a moment to scan the area. Are there live electrical wires, leaking fuel, fire, broken glass, or ongoing traffic?
Your safety is just as important as the victim’s. You cannot assist if you become a casualty yourself.
Check for Potential Hazards
In some situations, like chemical spills, unstable structures, or fires, it’s best to wait for trained professionals. Don’t put yourself in a position where your life is at risk.
If possible and safe, try to remove hazards or move the victim only if absolutely necessary and if you’re confident in doing so.
Step 2: Call for Help
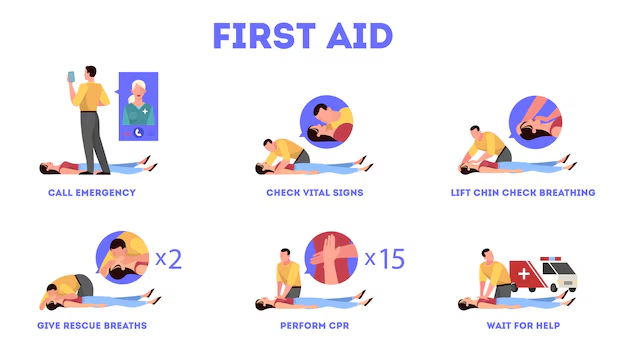
Once you’ve ensured the area is secure, call emergency services without delay. Every second counts.
When to Call Emergency Services
Dial emergency services (e.g., 911 or your local emergency number) if:
- The person is unconscious or not responding
- They are not breathing or gasping
- They are bleeding heavily
- They have chest pain, seizures, or signs of a stroke
- There’s been a serious accident
Never assume someone else has already called.
What Information to Provide
When calling, stay calm and provide clear information:
- Your exact location (address or landmarks)
- What happened
- How many people are involved
- The victim’s condition
- Any potential dangers on site
Stay on the line unless instructed otherwise and follow any instructions the operator gives.
Step 3: Check Responsiveness
Before administering any help, determine whether the person is conscious.
How to Check for Consciousness
Approach the person and speak loudly: “Are you okay?” Gently tap their shoulder or shake them. If there’s no response, continue to check for breathing and begin first aid.
If they respond, try to keep them calm, and do not move them unless necessary.
Talking and Tapping – What Works
In many situations, both physical touch and verbal cues can help assess a person’s level of consciousness. People who are semi-conscious may respond to sound even if they don’t open their eyes or speak.
If the person does not respond at all, they are considered unresponsive, and you must move quickly to the next steps.
Step 4: Open the Airway
An unconscious person may not be able to maintain an open airway, which is critical for breathing.
Head-Tilt, Chin-Lift Method
- Kneel beside the person
- Gently tilt the head back by placing one hand on the forehead
- Lift the chin using two fingers of your other hand
This movement helps prevent the tongue from blocking the throat, allowing air to enter the lungs.
Spinal Injury Precautions
If you suspect a head, neck, or spinal injury (e.g., due to a fall or vehicle crash), avoid moving the head. Use the jaw-thrust maneuver if trained, or wait for emergency personnel.
Step 5: Check Breathing
Once the airway is open, you need to determine if the person is breathing properly.
Look, Listen, and Feel Technique
- Place your ear close to the person’s nose and mouth
- Watch the chest for movement
- Listen for breath sounds
- Feel for air on your cheek
Do this for no more than 10 seconds.
What to Do if the Person Isn’t Breathing
If they are not breathing or are only gasping (agonal breathing), they need immediate CPR. Do not delay.
If they are breathing normally, place them in the recovery position while you wait for help, unless there’s a suspected spinal injury.
Step 6: Perform CPR or Provide Basic Life Support
CPR (Cardiopulmonary Resuscitation) is vital for victims who are unresponsive and not breathing.
Hands-Only CPR Instructions
If you are untrained or unsure, hands-only CPR is effective:
- Kneel beside the victim
- Place the heel of one hand in the center of the chest
- Place your other hand on top and interlock fingers
- Push hard and fast, at least 2 inches deep and at a rate of 100–120 compressions per minute
(Think of the beat of “Stayin’ Alive” by the Bee Gees.)
Rescue Breaths – When and How
If you’re trained:
- After every 30 compressions, give 2 rescue breaths
- Tilt the head back, lift the chin, pinch the nose
- Seal your mouth over theirs and breathe until you see the chest rise
Continue CPR until professional help arrives or the person starts breathing.
Step 7: Treat Other Injuries
Once the person is breathing or if CPR isn’t needed, begin checking for other injuries.
Control Bleeding
- Apply direct pressure using a clean cloth or bandage
- Elevate the injured area if possible
- If bleeding is severe and pressure doesn’t stop it, a tourniquet may be used if you’re trained
Treat for Shock
- Keep the person warm using blankets or clothing
- Lay them flat unless they have difficulty breathing or injuries that prevent this
- Elevate their legs if there’s no trauma to the spine or legs
- Do not give them food or drink
Burns, Fractures, and Wounds
- Burns: Cool the area with cool (not cold) water for at least 10 minutes. Never apply ice.
- Fractures: Immobilize using a splint or sling. Avoid moving the area.
- Wounds: Clean with clean water. Cover with a sterile dressing if available.
Additional First Aid Tips
- Stay Calm: Your attitude can influence the victim’s anxiety levels.
- Use What You Have: Improvise with available items—scarves, towels, belts.
- Reassure the Victim: Talk to them even if they are unconscious. Let them know help is coming.
These small actions can make a significant psychological and physical difference.
Why Everyone Should Learn First Aid
First aid isn’t just for healthcare professionals—it’s a skill everyone should have.
Imagine you’re at a playground and a child falls and hits their head. Or you’re at work and a colleague collapses. If you know first aid, you could be the reason someone survives.
From teachers, parents, and drivers to students and office workers—everyone can and should learn first aid. It builds confidence, responsibility, and community resilience.
Remember: You might save the life of a loved one—or they might one day save yours.
Conclusion
The 7 steps of first aid provide a clear and effective plan for handling emergencies. From checking the scene to calling for help, assessing breathing, performing CPR, and treating injuries, every action you take matters.
Learn them. Practice them. Share them. Because knowing first aid isn’t just helpful—it’s heroic.
You never know when you’ll need it, but when that time comes, you’ll be glad you were prepared.
FAQs
1. What are the 3 Ps of first aid?
The 3 Ps are the guiding principles of first aid:
- Preserve life
- Prevent worsening
- Promote recovery
2. How do I get certified in first aid?
Many organizations offer certifications:
- Red Cross
- St John Ambulance
- Local hospitals or safety organizations
Courses are available in-person and online.
3. Is CPR part of first aid?
Yes! CPR is a critical first aid skill used when a person is not breathing or has no pulse.
4. Can I be sued for giving first aid?
In many countries, Good Samaritan laws protect people who provide reasonable assistance during emergencies, as long as their actions are within the scope of their knowledge and training.
5. What’s the best way to teach kids about first aid?
Keep it fun and age-appropriate:
- Use cartoons or role-playing
- Teach them how to call emergency numbers
- Encourage them to stay calm and get help

0 Comments